Outlook Attachment Remover Add-in
Download |
Screenshots | How to use | Increase Outlook's performance | About |
Contact us
Other freewares:
Outlook Security Configurator |
Oh, my Dots!
|
|
» How to use» Installation- Download the Outlook Attachment Remover Add-in Setup Before running any attachment processor add-in is advisable to backup your Outlook files (see how here). » Running it- Run the Outlook
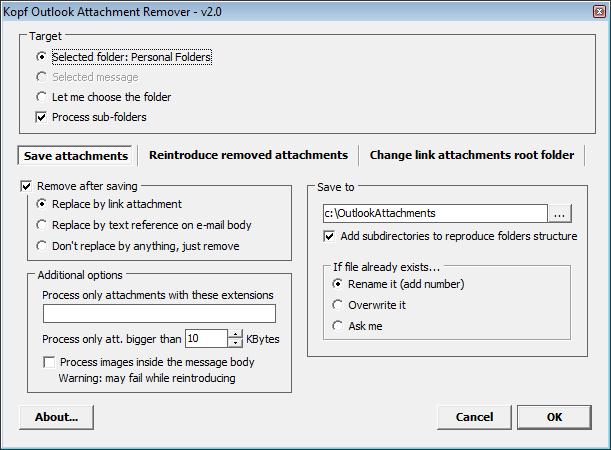
» Options (TO BE UPDATED)Target: Allows you to choose which attachments to save/extract: From the selected folder, from the selected message or from another folder (Let me choose the folder). When the last option is selected, after pressing the OK button a pick folder dialog will be prompted.Extensions: Lets you select a list of attachment extensions to process. Example: ".doc;.xls;.pdf" . The extensions should be separated by a semi-colon character. On the gaven example, only the Word, Excel and Adobe attachments will be processed. Attachment size: Allows you to process only big attachments, by specifying a minimum size in KBytes. The default value is 10KBytes. Usually, extracting small attachments doesn't save too much space. Remove after saving: when checked (default), after saving the attachment, removes it from the e-mail to decrease your Outlook file size. You may replace the attachment by a link to the saved file or by a link on the e-mail body.
Attention: Since the Microsoft Security Update 978212 some users are facing problems opening the link attachments after extracted. To fix this, please download the tool: Outlook Security Configurator
Save to: allows to specify where the attachments will be saved. If you are extracting the files from a shared folder, you may want to save the attachments on a shared directory as well (on your file server). Process sub-folders: when checked (default) process the sub-folders from the selected folder. Has no effect when the "Selected message" option is checked. Add sub-directories: when checked (default) reproduces the outlook foldes on the selected subdirectory. For instance, if you selected to save the files on the directory "c:\MyEmails", the inbox attachments will be saved on the "c:\MyEmails\Inbox" directory and so on.
|
 - A new command bar will appear. You may position it wherever you prefer.